
Rocking white hair can be an eye-catching, vibrant style. If you’ve fallen in love with the look of icy white locks, you may be wondering exactly how to get white hair. One option is, of course, to go to the salon, but if you’re more of a DIY lover, you can attempt to turn your hair white from the comfort of your home!
The process of obtaining white hair can be a difficult one, but fortunately, we’re here to help you out. In this article, we will discuss the products you need for dyeing your hair white, give you a run-down of the steps you will need to take, and leave you with some pro tips for caring for your newly white tresses.
- What You Need to Know About White Hair
- Understanding the Coloring Process
- Determining Your Hair Level
- Selecting the Best Bleach and Developer
- How to Choose a White Toner
- Step-by-Step Guide for Bleaching Hair
- Steps for Toning Your Hair White
- Pro Tips for the White Hair Coloring Process
- Caring for White Hair
- Who Can Turn Their Hair White?
- What Are the Risks of the Bleaching Process?
- How Long Will White Hair Last?
- Can You Get Rid of White Hair?
- Troubleshooting Bleach and Toner Issues
- Your Journey to White Hair
What You Need to Know About White Hair
White hair is one of the highest maintenance hair colors. It takes a lot of bleach and toning to get your hair this color, and you will need to maintain a consistent routine of upkeep to ensure your hair stays looking its brightest white.
Make sure that you fully understand the process needed to obtain white hair and have the steps planned out in your mind before attempting to turn your hair white, as this will help the transformation go smoothly and prevent any mishaps.
Understanding the Coloring Process
There are two main steps involved in the white hair coloring process: bleaching and toning. Bleaching sessions remove the darker pigments from your hair and leaves you with a light yellow color. You will then tone this light yellow to create a white color.
Unless your locks are already a very light shade of blonde, you will likely need to bleach your hair 2 or 3 times to get it to a color light enough to tone. The amount of bleaching needed and the toner color you use depends on multiple aspects, including your original hair’s color.
What Is the Color Wheel and Why Is It Important?
The color wheel is an integral part of the color theory that hairdressers use to reference complementary hair colors. You can use the color wheel to determine which pigments will be the most complementary with others, which colors cancel each other out, and the best colors to mix together to achieve your desired shade.
It is important to understand the color wheel because a basic knowledge of color theory and which pigments cancel out others will help you select the best toners and dyes for your hair, and can help you prevent and fix hair mishaps without making matters worse.
Determining Your Hair Level
Your hair level refers to how dark or how light your existing hair color is. Level 10 refers to the lightest blonde color and level 1 refers to the darkest black color. When bleaching and toning your hair, it is important to find a product that will work with your hair color and give you the results you want.
For instance, if you have dark, level 1 black hair, you will want a bleach that can give you several levels of lift, like this one that offers up to 9 levels; 9 levels of lift on a level 1 hair will put you at a level 10, the lightest blonde and best color for toning white.
Before toning your hair, it is important you get your hair to at least a level 9; otherwise the white toner will not work the way it is supposed to.
Selecting the Best Bleach and Developer
Bleach can come in two main forms – powder and cream. This bleach will need to be mixed with a developer to create a smooth formula that you then apply to your hair.
- Cream bleaches are typically less harsh and can be a good idea for hair that is already blonde or hair that is compromised.
- Powder bleach is usually stronger and better for serious lightening power or darker hair types.
Whichever one you choose, you should aim to get a professional brand, as these will often deliver better, more consistent results.
When choosing a developer, you should aim to get the lowest possible volume; developers are available from 10 volume to 40 volume.
- 40 volume is the highest (and most damaging) and only recommended in cases where you have jet black hair, and even then, you should not use it on the roots.
- 30 volume is the best choice for most darker hair types.
- 20 volume is a good option for hair that is already fairly light.
You should probably avoid 10 volume if you are bleaching, as you won’t see much lift with this volume.
How to Choose a White Toner
Selecting the correct toner is probably the most important step in creating white hair. The toner you choose will determine how white your hair turns out.
As you look for a toner, look for a product that offers you an ashy or icy blonde finish. Compare the example pictures with what you want for your hair to determine if the color is a good choice.
You should also look to make sure the toner is designed to be used on level 9 or 10 blonde hair. We recommend using salon-quality products for this too, as they will give a more vibrant white color with added dimensions.
Remember that your toner will also need a developer. It is a good idea to use a low volume developer, like 10 or 20, as you run less of a risk of damaging your already weak, bleached hair.
Step-by-Step Guide for Bleaching Hair
Bleaching hair can be risky, especially when you are doing it from home. Follow this step-by-step guide to bleach your hair as safely and effectively as possible.
Before Bleaching
In the weeks leading up to your planned bleaching sessions, try to add some extra hydrating activities in your routine, like hair masks and hair oil applications. The day that you are set to bleach your hair, don’t shampoo it. This will leave some natural oils on your hair that can help protect it from too much bleach damage.
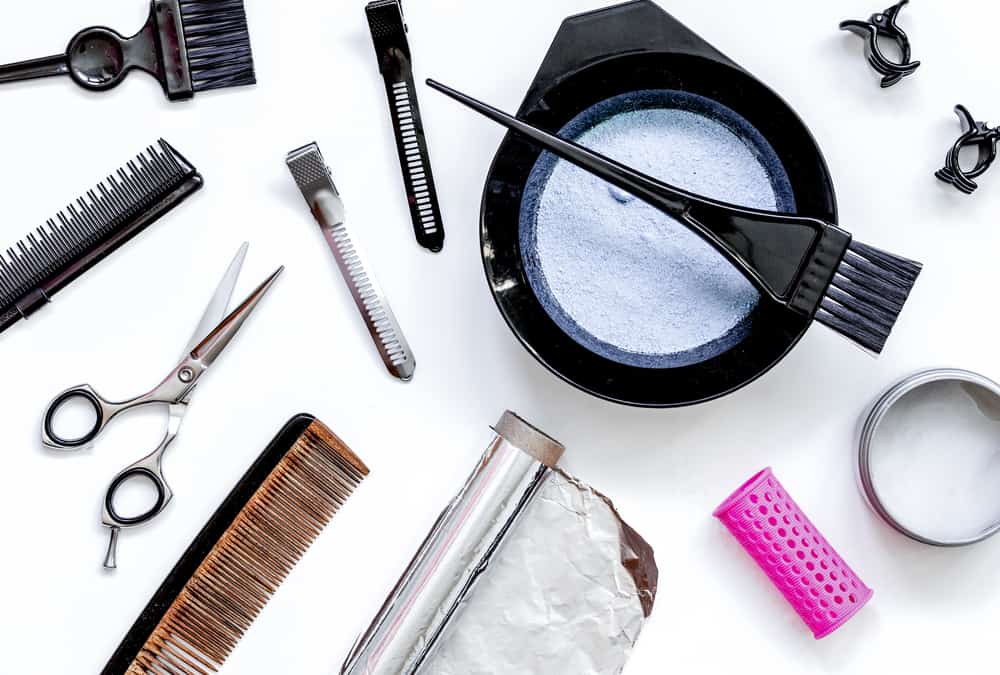
You will also need to gather all of your bleaching materials. You should have a pair of gloves, your bleach and developer, a plastic mixing bowl, a dye brush, and be wearing an item of clothing you don’t mind getting stained.
Create your bleaching mix by adding developer and bleach at a one-to-one ratio. You should then add developer into the mixture until it takes on a smooth, pudding-like consistency.
During Bleaching
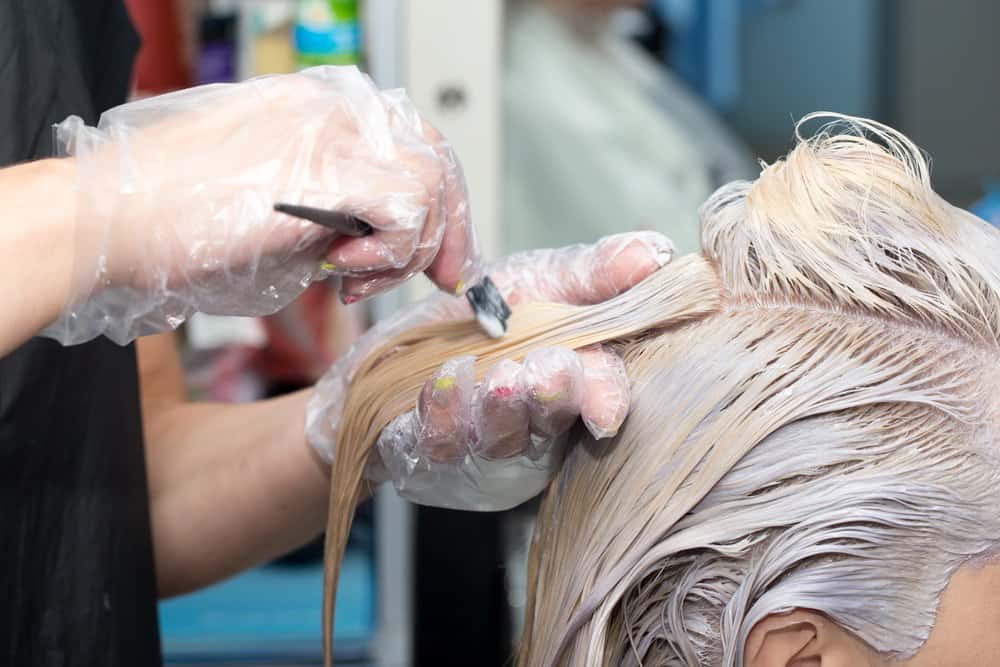
Before putting bleach on your hair, it will need to be sectioned out into four parts. Select a section to start with and pull a small section of hair out of it; this is what you will start applying your bleach onto.
Work from the back and bottom of your hair all the way up to the top, covering your hair in bleach from the midshaft to the end, leaving about half an inch of root unbleached. You can lay your bleached hair sections on top of each other as you make progress.
Each strand should have enough bleach on it that it looks like it is being covered in toothpaste. If you want to ensure the sections are coated evenly, you can smooth the bleach into your hair using your fingers once you paint it on. Do not try to lather the bleach on your head as this will give you an uneven application and may cause damage to your scalp.
Once your whole head as been covered in bleach, let it process for about 10 to 15 minutes. You can then go back and apply bleach to your roots, again starting at the bottom back of your hair and working your way up. After all of your hair, roots included, have bleach on them, wait the recommended about of time and allow your hair to lighten.
Remember, once you start bleaching. you will need to work quickly and smoothly to ensure all of your hair lightens evenly. It can help to plan out your steps and walk through it in your mind before starting. This video can help you visualize the correct application process.
After Bleaching
As soon as your timer goes off, head to the shower or tub to wash the bleach off your hair. The best way to do this is by flipping your head upside down and rinsing off the bleach with cool water. You will then need to shampoo and condition your hair to completely remove the bleach and stop any chemical reactions.
Comb-through your hair while it is damp and then allow it to air dry. The last step is to check out the color; if it is still too dark of a yellow or it has orange-brassy tones, you will need another round of bleach before toning.
If the color is a light level 9 or 10 blonde (it will still be yellowish here, but it shouldn’t be a dark or gold-yellow), you are ready to get to the next step. You can tone your hair immediately after bleaching it.
Steps for Toning Your Hair White
Once your hair is bleached to the lightest level possible, it’s time to apply your toner to bring out your favorite white color.
Before Toning
Before you start to tone your hair, you should make sure that all of the bleach is washed out. Your hair should be a little bit damp, but not soaking wet.
Separate your hair into small sections and prepare your workspace with gloves, a brush, and a plastic mixing bowl. Combine your toner and developer together into the bowl according to the instructions. If you have very thick or coarse hair, you may need more than one box of toner.
During Toning
Begin applying the toner to the midshaft and ends of your hair. You can paint it on with the brush and then use your fingers to fully coat each strand.
Work quickly from the bottom back of the hair towards the top and front to ensure everything tones evenly. Apply it to your roots last. Once your entire head is covered, wait for the chemicals to work their magic.
Start checking the color of your hair after 10 minutes and every 10 minutes after that until you reach your desired color. Make sure you are familiar with the timing guidelines set by the product.
After Toning
When you’ve determined that the toner has been on your hair long enough, you can rinse it off. Shampoo and condition your hair, comb through it with a wide-toothed comb, and then let your hair air dry.
Once it is completely dry, you can examine the color and decide if you need another round of toning to make it the exact white color you desire.
Pro Tips for the White Hair Coloring Process
These pro tips will help you achieve even coloring and prevent some of the most common hair bleaching mistakes.
Remove Existing Pigment
You should never be trying to bleach your hair over existing pigment, particularly darker colored box dyes. Doing this can result in only a little bit of color being removed and may end up forcing you to repeatedly bleach your hair to get all the color out, further compromising your tresses.
If your hair is already dyed, no matter the type of dye, you should be using a color remover on your hair before bleaching. This will remove the existing pigment on your strands and allow the bleach to penetrate further into your cuticles, lightening your hair more effectively. It can also prevent strange orange, red, or green colors from appearing on your hair.
Use a Plastic Bag or Cap
During both the bleaching and toning sessions, you should cover your hair up with a plastic bag or shower cap while the chemicals get to work on your hair. Doing this incubates your head, adding extra heat that allows your hair to process quickly and more efficiently.
For an added bonus, lightly spray the inside of the bag or cap with water to create a steaming effect.
Wait Between Bleaching Sessions
If you have particularly dark hair or you know you will have to bleach your hair more than once to achieve the perfect lightness for toning, you should plan out your sessions, leaving time in between them.
The best amount of time to leave is 2 weeks between each bleaching session; this gives your hair time to repair a little bit and regain some integrity before the next bleaching session.
If you absolutely can’t wait 2 weeks between bleaches, you should at least put a couple days in between processes to give your hair a break. It is not recommended to bleach more than one time in a day.
Touch up Strategically
Once you’ve rinsed the bleach or toner out of your hair, you may notice spots that are still too dark or too yellow. In both cases, you should prepare yourself for a touch up to get the most desirable final product.
Separate the strands that need redoing and carefully touch them up using the same method you used to bleach or tone all of your hair. Check regularly as the chemicals work to make sure your hair is turning the desired color and rinse out the toner or bleach once it matches the rest of your hair. You can then repeat a bleach or toner process on your entire head.
Don’t Start at Your Roots
When bleaching or toning your hair, the last thing you want to do is start at your roots. This is because the heat coming off of your scalp will cause the roots to process faster than the rest of your hair, turning them lighter. This will leave you with bright, light roots and hair that is a darker color.
Always leave your roots to last, covering them once you have bleach or toner fully applied to the rest of your hair. Alternatively, you could complete the bleaching or toning process and then go back in and do your roots separately; this method is great if you want maximum control over the process. This video can help you better visualize the root coloring process.
Caring for White Hair
White hair, especially freshly dyed white hair, is incredibly fragile and fairly dry after the long bleaching process to obtain it. You should use these tips to care for your white hair and ensure it stays looking and feeling its best.
Skip Wash Day
Whenever your hair has gone through a damaging process such as bleaching, it is a good idea to spread out your wash days. Shampoo is designed to clean hair by stripping it of its natural oil; this action can accentuate any damage on your hair, especially if you are shampooing every other day.
Try washing your hair once a week and make sure to follow up with a super hydrating conditioner. If your hair gets greasy in between washes, you can always try out a little bit of corn starch or a dry shampoo to freshen up your locks.
Purchase Purple or Silver Conditioner
A toning conditioner that is infused with purple or silver pigments can help your white color stay on point. Every time you condition your hair, the pigment will work to cancel out any emerging yellow or darker tones, as per the color wheel.
You may also find purple shampoo advertised, but for hair that has been bleached and toned as much as white hair usually has, a conditioner will be more hydrating while still delivering toning results.
Know When to Repeat the Toning Process
White hair tends to lose its brilliance faster than other colors, meaning that you will have to regularly repeat the toning process to keep it the exact white color you want. This process should be repeated every 2 to 8 weeks, depending on your hair and the white color you are going for.
A good indicator to look for when deciding to re-tone your hair is if your locks are starting to look uniformly yellow or purple conditioner is not quite helping to remove any brassy tones. When repeating the toning process, you can use the same method as they way you put toner on in the first place.
Avoid Heat Styling
Though effective, heat styling tools can cause a large amount of damage even on normal, healthy hair, let alone your bleached white hair. To prevent any further dryness or potential hair breakage, you should be avoiding using heat styling tools, including hair dryers, as much as possible.
If you absolutely must heat style, don’t do it more than once a week and make sure the heat settings are turned down as low as possible.
Who Can Turn Their Hair White?
Anyone who wants to dye their hair white can totally do it, but there are some circumstances that need to be considered before committing to this color.
White hair turns out the best on virgin hair (hair that has never been dyed) and hair that doesn’t have any preexisting dye already in it. Naturally darker hair colors and anyone with a preexisting dye in their hair will have a harder time turning their hair white, but it is possible with a little bit of patience.
What Are the Risks of the Bleaching Process?
The bleaching process has long been known to cause extensive damage to your hair, especially when you bleach your hair multiple times like you will need to do for white hair. If you use too high of a developer amount, bleach your hair too many times, or leave the bleach on too long, it is very likely that you will experience a burning scalp, hair breakage, hair dryness, and general frizziness.
To prevent these risks, use the lowest developer amount possible and rinse the bleach off as soon as you reach your desired lightness. You should also make an effort to keep your hair extremely hydrated both before and after bleaching.
How Long Will White Hair Last?
You can expect your white toner to fade out anywhere between 2 and 8 weeks, depending on the brand and how you care for your hair. As it fades, you will end up with the more yellowy color you started with right after the bleaching process was completed.
At this point, you can re-tone your hair white, or you can start looking into dyeing it a different color.
Can You Get Rid of White Hair?
It’s entirely possible that after all the time you spent trying to obtain white hair, you end up not liking the final product. In this case, you may be wondering if you can just put a dark dye over your white hair and call it a day. However, doing this is a very bad idea.
In order to get your hair white, you would have removed as much pigment as possible from each strand with bleach. If you attempt to put a dark dye on top of that, you will probably end up with a mucky green-brown color, as the darker colored dye doesn’t have any existing pigment to latch onto and enhance.
If you truly want to get rid of your white hair, you will need to use several hydrating and reconstructing products, like the bond builder Olaplex, before following up with a color filler, and then your desired hair color.
Troubleshooting Bleach and Toner Issues
Sometimes even the best-planned bleaching and toning processes can leave much to be desired. Check out these common bleach and toning issues if you need help troubleshooting where you went wrong.
Bleaching Isn’t Even
If you’ve just bleached your hair for the first time and it has come out looking patchy, there is a chance that you didn’t coat your strands evenly enough. Patches are caused by the bleach being too concentrated in one area and lacking in another.
Make sure to use small sections when bleaching and apply enough bleach so that your hair is fully saturated. This will give you the most even, light look. If you do end up with patches, you will need to go back and touch up those sections with another round of bleach.
Brassy Color After Bleaching
A brassy yellow or orange color is very likely to appear after a first bleaching session, especially if you have dark black or brown hair; you will probably not be able to achieve a super light blonde with your first bleach process.
To fix this brassy color, you should bleach all of your hair again to get it as light as possible, before applying a white toner.
Toner Doesn’t Seem to Work
Once you’ve applied toner and left it on for the recommended amount of time, it can be disheartening to wash it off and see that no difference has been made to your hair. The most common reason for this to happen is due to your hair not being light enough before you applied the white toner. Remember, your hair should be at a level 9 or 10 blonde before you attempt to tone it white.
Alternatively, this problem could be due to the toner you selected not having the right pigments to turn your hair white. Look back at our section on selecting a toner for help with this.
Toner Turns Hair Blue, Silver, or Purple
When your hair turns blue, silver, or purple, there is a chance you have left your toner on for too long. Blue, silver, and purple are the pigments usually found in toners that help to cancel out yellow pigments and leave your hair looking white. Leave a toner with this color in your hair too long and your locks can absorb some of the pigment.
The best way to fix this is to wait for the toner to fade a little bit (which should happen within a few weeks) and try toning again, leaving the product on for less time.

Your Journey to White Hair
Once you decide to dye your hair white, you’re guaranteed to be in for a long journey full of hard work and regular maintenance. The reward of this effort, however, is the perfectly toned white hair of your dreams.
As long as you are careful bleaching your hair and make sure to care for your locks properly afterward, you’ll have stunning white hair for as long as you want it around.