Are you a hair dye veteran who’s looking to take their color game to the next level? If so, we’ve got you covered. Most folks end up adjusting their box color a little bit to get their hue of choice anyway, but going about it all willy-nilly will leave you with some interestingly-colored locks at best and a head of fried hair at worst.
Given the pitfalls a hair dye rookie might encounter when attempting to dilute hair dye on their own, we’ve gathered a few of our favorite tested methods for going up or down a shade or two. Later on we’ll talk more about what to avoid when diluting hair dye, the different parts of the hair, and the roles they play in the dyeing process.
3 Safe and Effective Ways to Dilute Hair Dye at Home
Whether you’re looking to play with your box dye’s color or create an inexpensive, homemade aftercare product, here are three ways to do it that’ll leave both your skin and hair intact.
You can also use these methods to preserve your current color a little longer or cut down on brassiness.
1. For a Toning Shampoo: Hair Dye and Shampoo
Interestingly, one of the best hair dye diluters is already in your shower. Mixing shampoo with your hair dye is a great, cost-effective way to create toning shampoo at home. For those not in the know, a toning shampoo plays up certain tones in your hair to boost color and minimize brassiness (or other unsightly hues).
You can find toning shampoo just about anywhere that sells hair products, but usually not without forking over a considerable sum first. What’s more, toning shampoos sold in stores tend to come in a pretty limited color selection: blondes, brunettes, and redheads.
This means that those with more eclectic hair colors will have to look high and low for toning shampoos that can help them maintain their rainbow-colored ‘dos.
Fortunately, you can enjoy all the benefits of a toning shampoo (without the price tag) by diluting your hair dye with shampoo at home. But the money you’ll save isn’t the only good thing about it–you’ll also create a customized toning shampoo that’ll keep your tresses in finely-colored form.
What You’ll Need
- Half a bottle of regular white shampoo
- Half a tube of your desired hair color
- An empty shampoo bottle
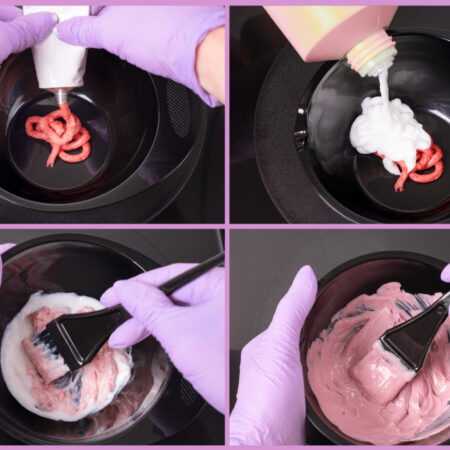
Pour the shampoo and hair dye into the empty bottle and mix until it’s consistent throughout. Once that’s done, your new toning shampoo is ready for use.
Pretty simple stuff–just don’t use it every day. We recommend using it whenever you wash your hair, and you can even let it sit on your hair for 20 minutes or so to reap the full toning benefits.
2. For a Color Rinse: Hair Dye and Conditioner
If you thought a color rinse and toning shampoo were the same thing, you’re not alone. But despite their seemingly similar names, they’re actually quite different from each other. A color rinse is essentially a temporary hair dye, and great for those who want to play around with a certain shade before fully committing.
You can also opt for a clear color rinse if you’re simply looking to add some shine to your hair, but right now, we’ll focus more on DIY color rinses made with hair dye and conditioner.
Colored hair typically loses its va-voom over time, so it’ll need periodic boosts to keep it looking fresh. In this sense, color rinses and toning shampoos are the same: they both give color-treated hair some much-needed pep.
However, the versatility of color rinses–both DIY and store-bought–make it great for both dye divas and au naturel novices alike.
What You’ll Need
- Conditioner–whatever kind you already use will do
- Half a tube of your desired hair color
- An empty container
Pour half the tube of your hair dye into the empty container and fill the rest with conditioner. It’s important to add only half the hair dye, as pouring more or less will mess with the consistency and overall color. Mix well and apply the color rinse from root to tip, leaving it on your hair for 20 minutes.
These color rinses are especially great for the summer, when UV rays and chlorine are much more likely to strip your hair of its hard-earned hues. You’ll notice an immediate difference in both the color and shine upon washing it out, making these color rinses an indispensable part of your summertime hair care routine.
3. For Dissolving Dye: Hair Dye and Hydrogen Peroxide
Last but not least, you can use hydrogen peroxide to dissolve any permanent dye you want to use for touching up your roots or changing your color altogether. You can also use this concoction to give your tips a little shock of color, which makes this method particularly great for hair color enthusiasts who like to play around.
Hydrogen peroxide helps pigment molecules penetrate the hair follicle more deeply by opening up the hair shaft. Think of each strand of hair as covered in “scales;” when you lift these scales, pigments can enter the hair cortex more easily, which is where the bulk of your color lies.
Hydrogen peroxide flushes these pigments out to make way for the new color, which is why you’ll see it in most commercial box colors.
What You’ll Need
- A hair dye kit
- Hydrogen peroxide
Simply mix your hair dye kit as you would and then add some extra hydrogen peroxide, making sure that the mixture isn’t too light or too thick. Once that’s done, apply the dye as you normally would and let it sit for as long as the kit recommends.
Depending on whether you’re just touching up your roots or dyeing all of your hair, you’ll need to let it sit for a shorter or longer amount of time. Just try not to slather too much hydrogen peroxide on your skin. Those with more sensitive hides will discover that hydrogen peroxide burns if left on for too long.
You’ll also have to contend with the fact that hydrogen peroxide isn’t the most follicle-friendly solution; since it basically cracks open the strands of your hair, you’re more likely to do some serious damage to your mane.
With these awesomely inexpensive methods in mind, let’s take a look at some things to avoid when dealing with diluted hair dye.
Diluting Hair Dye: What to Avoid
If you’re new to the dye game, then the chances of you concocting a solution that’ll fry your hair are higher than normal. However, you can lessen the risk of damage by following these helpful tips for what not to do when diluting and applying.
Mixing Hair Dye With Water
You may be shocked to learn that diluting hair dye with water will do nothing to lighten the color or actually dilute the solution. This is because hair dye doesn’t react to water on a molecular level. The only thing it’ll do is effectively render the dye useless.
Mixing Hair Dye With Thermal Oil
Here’s another seemingly common-sense solution that’s actually pretty disastrous in practice. Surprisingly, mixing hair dye with thermal oil for an added moisture boost will only make your hair horribly greasy, as thermal oil coats the hair and prevents color from penetrating the hair cortex.
In a word, you’ll achieve the exact opposite effect of what you want by mixing hair dye with hair oil.
Too Much or Too Little of an Ingredient
The measurements for these DIY solutions are precise for a reason: messing around with them will likely affect how well they work on your hair. This is why we highly, highly suggest following the measurements we’ve listed above, as tampering with them will only waste your time and a perfectly good box of hair dye.
For example, adding too much hydrogen peroxide will not only make your diluted solution useless, but it’ll probably burn your delicate scalp as well. Do yourself a favor and make your hydrogen peroxide measurements as precise as possible–both your hair and skin will thank you.
Anatomy of the Hair
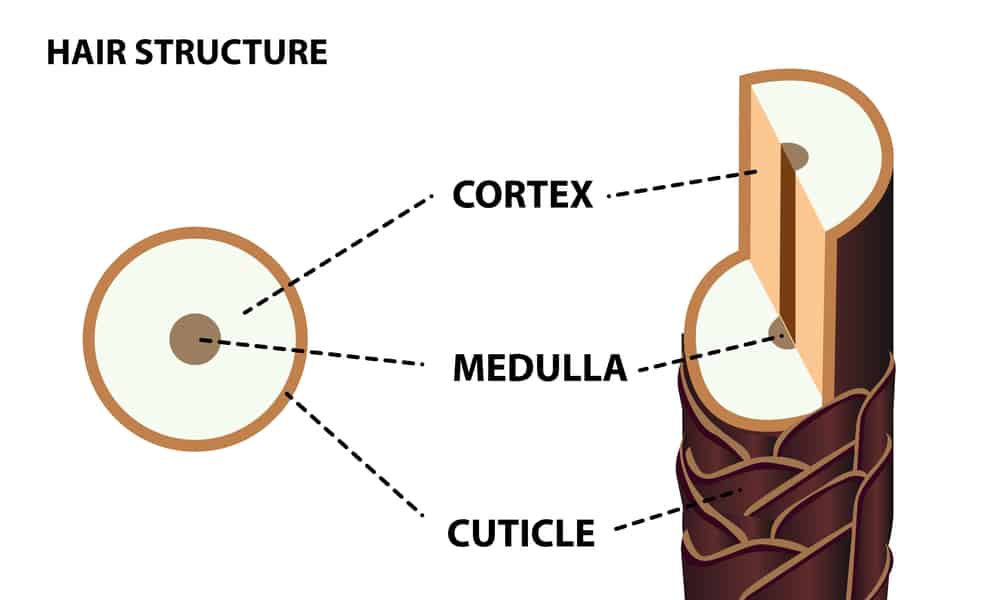
For our more curious colorists, we’ve broken down hair into the three parts that matter most during the dye process. Knowing how the hair strand is structured might help you visualize the way hair color works on your tresses a little better, so read on to learn more about the anatomy of the hair and how coloring agents act on it.

Hair Cuticle
This is the outermost layer of the hair, as well as the part that’s visible to the human eye. Like we mentioned earlier, the hair cuticle is actually made up of layers and layers of tiny, overlapping “scales,” which can be lifted by certain chemicals (like hydrogen peroxide, for example) to let new pigment molecules burrow into the inner part of the hair.
Since it’s on the outside, the hair cuticle is the most prone to damage, so folks with color-treated hair need to do a little more maintenance to keep their delicate, colored tresses smooth and shiny.
Hair Cortex
The hair cortex is where most of your hair’s color can be found. That’s why lifting the scales of the hair cuticle is so important–it lets the chemical agents in the dye flush out the color that’s already in the cortex to make way for the new hues.
Naturally, it’s easier to go from lighter to darker than vice versa; less color to strip away means less damage to your hair.
Medulla
This is the thinnest, innermost part of your hair. It’s not really affected by hair dye at all.
There are plenty of other parts to the hair strand, but you only really need to know these three when dyeing your hair.
Get Ready to Dilute
Clearly, there’s more to diluting hair dye than just adding some water and calling it a day. But now that you have a better idea of how to safely and effectively dilute hair color, you can get the toning shampoo or color rinse of your dreams–and at a fraction of the cost, no less.
Have fun with your new color concoctions, and don’t forget to wear an old T-shirt!
